Table of Contents

Bank Rules – The Basics
If you run a SaaS company with outsourced accounting help, chances are that you have experienced the monthly ritual of back and forth emails when categorizing transactions. Somehow expenses under one account end up in another the following month. Even though you send a bunch of red-lined emails saying "as I told you last month, bills from X go to...", the process repeats in the coming months.
While not excusable, the process is at least understandable. Your bookkeeper may not be dedicated to your company, and it's not like they are incentivized to come up with solutions that cut down their billable hours. You aren't probably paying them enough either.
Enter Xero bank rules.
Bank rules pick up an expense description provided by your bank - the Reference - and use the fixed instructions from you to always categorize the expense the same exact way. The goal is to reduce human error and speed up the monthly closing process.
This is best understood by looking at an example. One of the most common mistakes we see is incorrectly categorized hosting expenses. The inaccuracy leads to inaccurate SaaS metrics such as lower gross profit margins, and thus lower LTVs and longer CAC Payback times. The reason for the error is often very simple – their bookkeeper lumps all expenses from Amazon under hosting (or worse, software or office expenses). If the company buys their computer equipment, office supplies, and say, referral gift cards all from Amazon, suddenly this discrepancy becomes material.
If we use the bank rules, this error won’t occur as we can tell the rule to categorize anything with a bank description of Amazon Web Services to Hosting, but anything with Amazon.com or Amazon MKTPLACE to Office Expenses.

This post is part of a series for SaaS CEOs and Founders on organizing SaaS Chart of Accounts. The goal of the series is to provide practical advice on organizing and automating your financial backend, which results in more accurate forecasts and a faster feedback loop through a quicker closing of the books.
Note: This is a the same post as How to Automate your SaaS Expenses with Quickbooks Bank Rules, but with examples specific to Xero.
How to Use Bank Rules – Example
Let’s look at another common mistake where all expenses from Google have been applied to one expense category.
Your forecasting needs for Adwords, GSuite and Google Cloud are all very different, which is why you should also categorize them separately: Google Cloud is a hosting cost that increases alongside your revenue, whereas GSuite is an General & Admin (overhead) software cost that grows as your team grows. Adwords, on the other hand, is a potential revenue driver for your business, and grouping it with other expenses will make it impossible to accurately project your future revenue.
For simplicity, we’re going to leave out Google Cloud and GSuite from the example below.
Here is a view from the Xero Reconciliation (Cash Coding), which pulls your company transactions from your bank accounts and credit cards. Below is an example of a transaction spent to Google Adwords.

The Reference column displays a long line of text and numbers, but the first part – GOOGLE*ADS – is what we care about. Let’s use this information to create our first bank rule.
Click on the arrow on right, and select Create bank rule. Feel free to check out Xero's more detailed instructions.

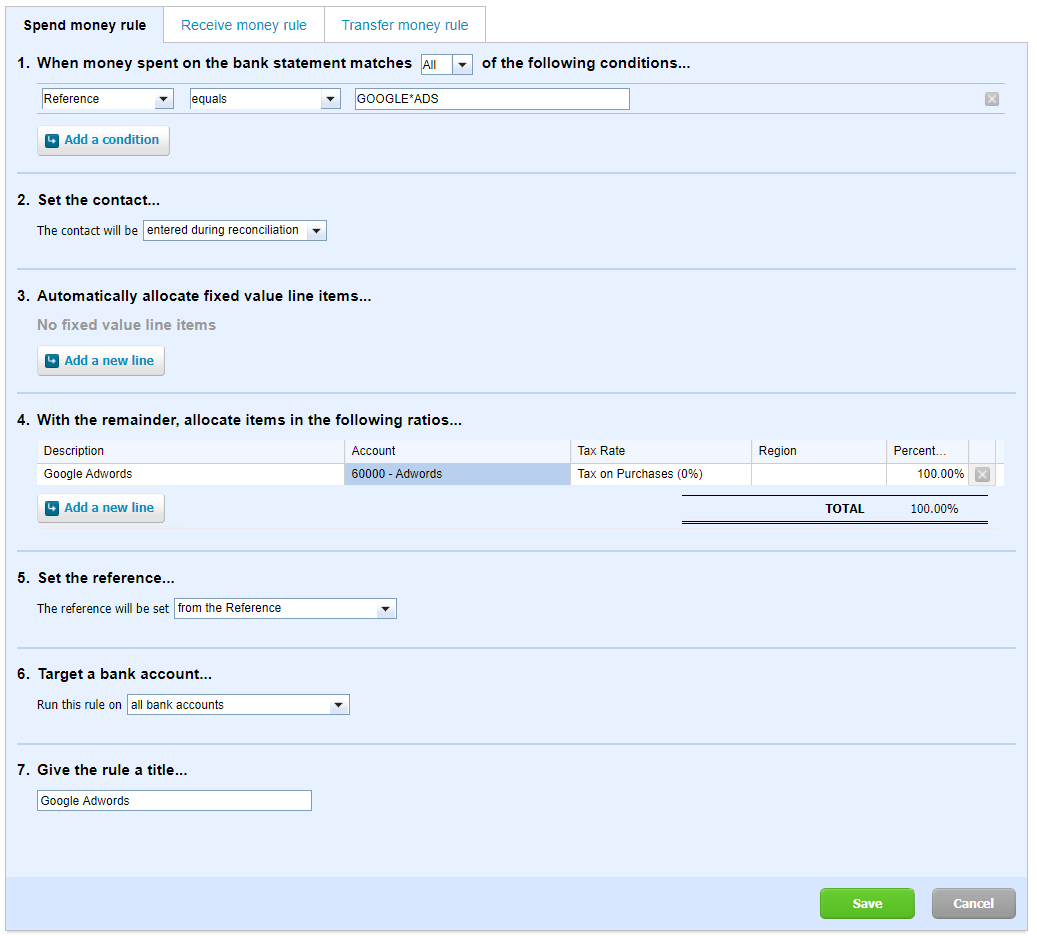
Next, fill in the blanks. The key part to get right is the conditions - as in, what should the rule acutally pick up.

1. Conditions: Select all, and use Reference from the available options. Now, take the same GOOGLE*ADS and write it to the empty text field. Alternatively, you could select Any Text Field instead of the Reference column.
2. Set the contact: Add a contact, if applicable. You can also change this to be entered during reconciliation.
3. Allocate fixed value (Split expense). Optional step to split the expense into multiple Accounts. For example, if you pay for Google Cloud, you might want to allocate a few hundred from your bill towards R&D software spend instead of testing, given your engineers are likely to run non-customer facing environments for testing purposes.
4. Allocate the remainder: This is the where you want to categorize the expense on an ongoing basis. For example, we can allocate all Google Adwords transactions into "Adwords" account. The Tax Rate is something you you need to figure out with your accountant.
5. Set the reference.
6. Target a bank account. Usually, you'd want the rule to apply to all bank accounts.
7. Give the rule a title. This is quite self-explanatory.
Apply the Bank Rules
Now as you navigate back to Reconcile tab, you'll see the suggested bank rule you just created. All you need to do is to click OK.

Takeaway
In this post we went through automating your SaaS expenses by using Xero bank rules. The rules only apply going forward, so for any historical cleanup you’ll have to go to the Account transactions tab and Remove & Redo transactions you want to re-categorize using rules. Just make sure not to remove anything before checking in with your accountant.
Automating the categorization of your recurring expenses will enable more accurate financial projections and faster closing of the books. It will also save time for your accountant that can be used for more value-adding work.

