Table of Contents
This article walks you through how to use Gusto’s integration with Quickbooks to split your payroll into categories according to SaaS best practices. An automatic sync will save you money, reduce the room for error, and speed up the monthly closing of your books. If you are using both tools already, the set up is quick and easy.
Note: This post is a part of a series on organizing SaaS Chart of Accounts. The goal of the series is to provide practical advice to SaaS CEOs and Founders on how to organize and automate their financial backend.
After reading each article, you should be able to add your own comments and forward it to your Accountant or Director of Ops for implementation.
1. Set Up Departments
First, make sure you have your Departments set up in Gusto and everyone in your team has been assigned to a Department.
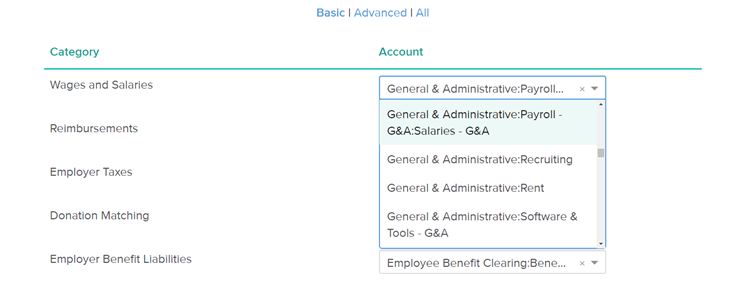
This post assumes you are following SaaS best practices in categorizing your books – and thus payroll – to Cost of Revenue, Research & Development, Sales & Marketing and General & Admin, as described in the Part 1 of this series. As a result, your General & Admin payroll should look something like this in Quickbooks:

If your books look different, implement the Part 1 of the series first before continuing further.
2. Connect Quickbooks
After completing the Quickbooks Online (QBO) connection, you’re prompted to map your default Gusto accounts to the ones in your accounting. Personally, I prefer mapping only the bank account and set everything else to Uncategorized Expense. This will ensure that if a department-level mapping fails (to be set up in Step 5), you’ll notice it quickly as your uncategorized expenses will shoot up.

3. Enable Department Sync
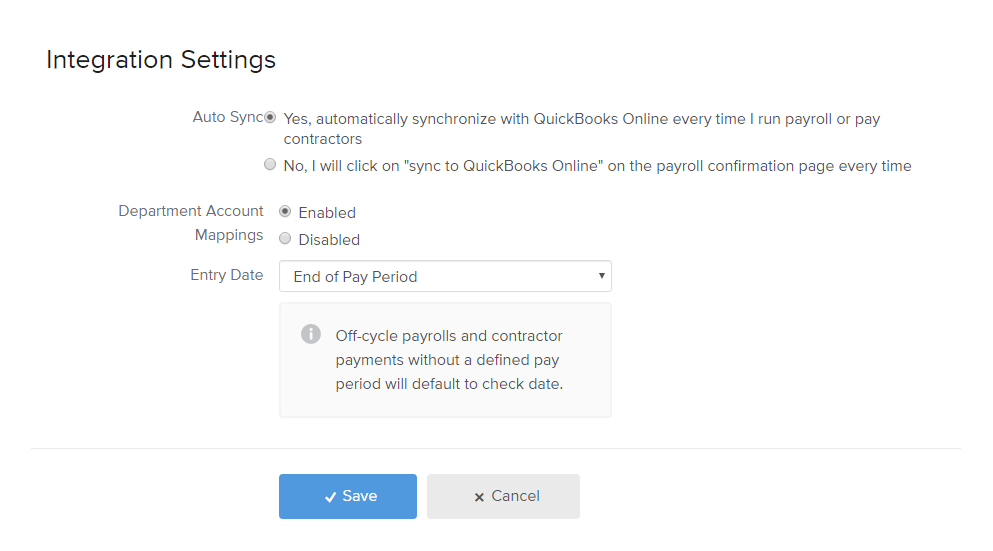
Next, while staying in the Quickbooks Online Integration page, enable the Department Account Mappings from the sidebar on the right. Optionally, you’re able to change the entry date of the expense in Quickbooks. In my experience, End of Pay Period seems to be the most common choice.
4. Department Account Mappings – Basic
Now, we can begin to map the departments. You should see something like this at the bottom of the Integrations page:

Click Setup and you’re going to see an option of setting the Basic Mappings. I recommend doing this step first as it’s going to make it a lot faster to go through the Advanced Mappings.
Map the Wages & Salaries Gusto account to the salary account in Quickbooks. It’s likely named something like Salaries – G&A. Repeat for the Employer Taxes. Finally, map the benefits liability account to any account in your balance sheet. It doesn’t matter which one, as you’re going to reset this in the next step in a few minutes.
One quirk worth noting is that Gusto does not pull in the formatting of your Quickbooks accounts, so you can’t use the indentation to see whether you are linking the right account. Gusto does pull in the QBO syntax however, which just means that each parent-child account relationship is marked with a colon. For example, General & Administrative: Payroll – G&A: Salaries – G&A represents a Salaries – G&A account, which also happens to be a child or the Payroll – G&A and a grandchild of the General & Administrative accounts.
Since I would not recommend doing reimbursements through Gusto (use Abacus or Expensify instead), you can map Reimbursements to go to Uncategorized Expense account in Quickbooks. This way you can always clear out the uncategorized account if you happen to do an one-off Gusto reimbursement.
Hit Save for the changes to take effect.
5. Department Account Mappings – Advanced
After completing the Basic mapping, you should see the same Department with 3-5 accounts mapped. Select Edit, and navigate to the Advanced mapping tab.

Now you have about 30-50 options to select from, depending on how many benefits you offer. Luckily, most of the mappings go to the same account, such as the first four of Regular Salaries, Vacation Pay, Sick Pay and Overtime all mapping to the default Wages account in Quickbooks.
The first account you want to map differently is likely your contractors. Select a contractor account from your Quickbooks accounts – probably named along the lines of Subcontractors – G&A.

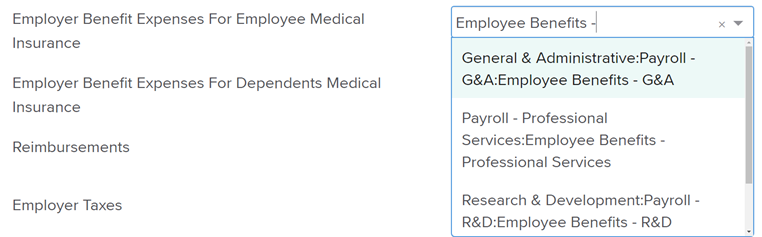
Next, map all your Employer Benefits Expenses to their respective Quickbooks accounts, typically named as Employee Benefits – Department Name.
You can skip Employer Taxes and Reimbursements as those were set in the previous step., but you do need to change every mapping for Benefit Liabilities.
If you haven’t set them up already, now is a good time to hit Save and go to your Quickbooks to create clearing accounts for each of your benefit vendors. As Gusto doesn’t handle the payments to your benefits providers directly – unlike the payments to IRS and state tax agencies – each payroll run creates a liability in your books that gets paid out to the benefit provider.
In Quickbooks, navigate to Accounting on the left sidebar, and select “New” on the top-right section of the Chart of Accounts page.
Start by selecting the Account Type. Set it to Other Current Liabilities, followed by setting the Detail Type to Payroll Clearing. Name the account according to the type of the benefit, such as Health Insurance Clearing.
Keep in mind you should create a clearing account for each one of your benefit vendors, such as medical, dental, vision and 401k, as it makes it easier to trace things back if integrations get out of sync or you miss a vendor payment.
Select Save and Close, and navigate back to your Gusto Integration screen. There’s no need to create clearing accounts for each department, as mapping the benefit expenses will do the work for you.
All there’s left to do in Gusto is to map each Benefits Liability account to Quickbooks:

Finally, repeat this process to the other departments of Cost of Revenue, Research & Development, Sales, and Marketing. The sync will be faster as you have your benefit clearing accounts created already, and all you need to do is a bunch of syncing. Keep in mind that for Sales payroll, you’ll probably want to map Commissions to its’ own individual account in Quickbooks – not the regular salaries.
6. Monthly Closing
Although everything is syncing already, let’s take a look how things look in Quickbooks for the month-end close. Once you run your next payroll, you should see something like this in the Banking section of your Quickbooks Online:
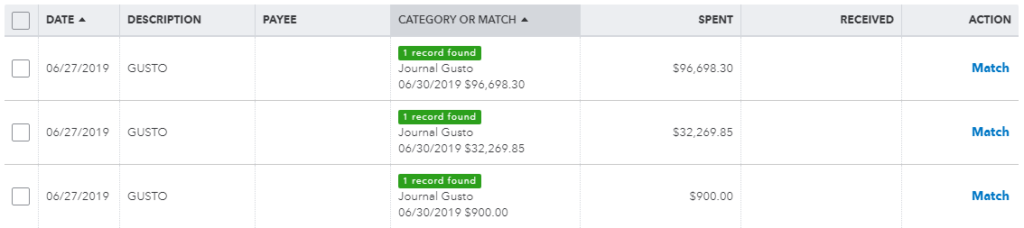
Gusto debited the company bank account for $96,698.30 for the net salaries, $32,269.85 for the taxes, and $900.00 for employee donation matching. Now, without the sync these would be tedious to allocate to each department, but luckily the newly created sync will do it automatically. In short, Gusto creates three journal entries that will tell Quickbooks how these transactions should be categorized.
The very last part of the puzzle is to wait for your next benefit vendor payment to come through, as this is often happening outside your regular payroll schedule. Once the transactions shows up in Quickbooks, select Add – not match – it to your clearing account for the same vendor. For example, your Medical Insurance paid to Blue Cross might end up in Health Insurance Clearing account, whereas 401k payments to Guideline ends up in 401k clearing.
Takeaway
We learned how to set up a sync between Gusto and Quickbooks to automate splitting your payroll into categories. This will save you time, and if you were paying an accountant to do this manually, also money. You should be able to set up the sync and leave it until you create a new team in Gusto or sign up with a different benefit vendor.
