Table of Contents

Given you probably just finished closing your books for 2017, it’s a good time to introduce changes to plan for the coming year. Proper expense categorization improves your visibility into your company’s spending while enabling more accurate metrics and forecasting. After all, as a startup founder, you want to have a solid idea of what your true gross margins are and what it actually costs to acquire a customer!
Most startups I’ve seen often get at least some of this wrong, particularly if they are doing around $100k in MRR or less. As a result, we typically spend the first couple of weeks with a new startup helping their bookkeeper to re-categorize their expenses before we can even begin forecasting or calculating metrics.
Overview
In this post, we’re going to set up your accounting to use four typical categories — accounts —that will fit the use case of most small to medium SaaS startups. The main accounts are:
- Cost of Revenue
- Sales & Marketing
- Engineering (R&D)
- General & Admin (Overhead)
We’re using Quickbooks Online as the example accounting software, but you should be able to follow along if you use something different, such as Xero.
Cost of Revenue
First, let’s look at setting up your Cost of Revenue (sometimes called Cost of Sales, or Cost of Goods Sold). You’ll need this to calculate your Gross Margin, which further enables you to calculate Customer Lifetime Value and other key SaaS metrics.
This is where you record all of the costs that go to providing your service, such as hosting and customer support payroll. You should also include software that directly assists your support personnel such as Intercom or Help Scout, and software that helps you with your hosting, such as CircleCI.
Open Quickbooks Online, and navigate to Accounting on the left sidebar. A Chart of Accounts will open up, with all of your Balance Sheet and Income Statement accounts listed. Keep your eye on the “Type” column, and scroll down to Cost of Goods Sold, which is what Quickbooks calls the Cost of Revenue.
We want to make the section look like this:
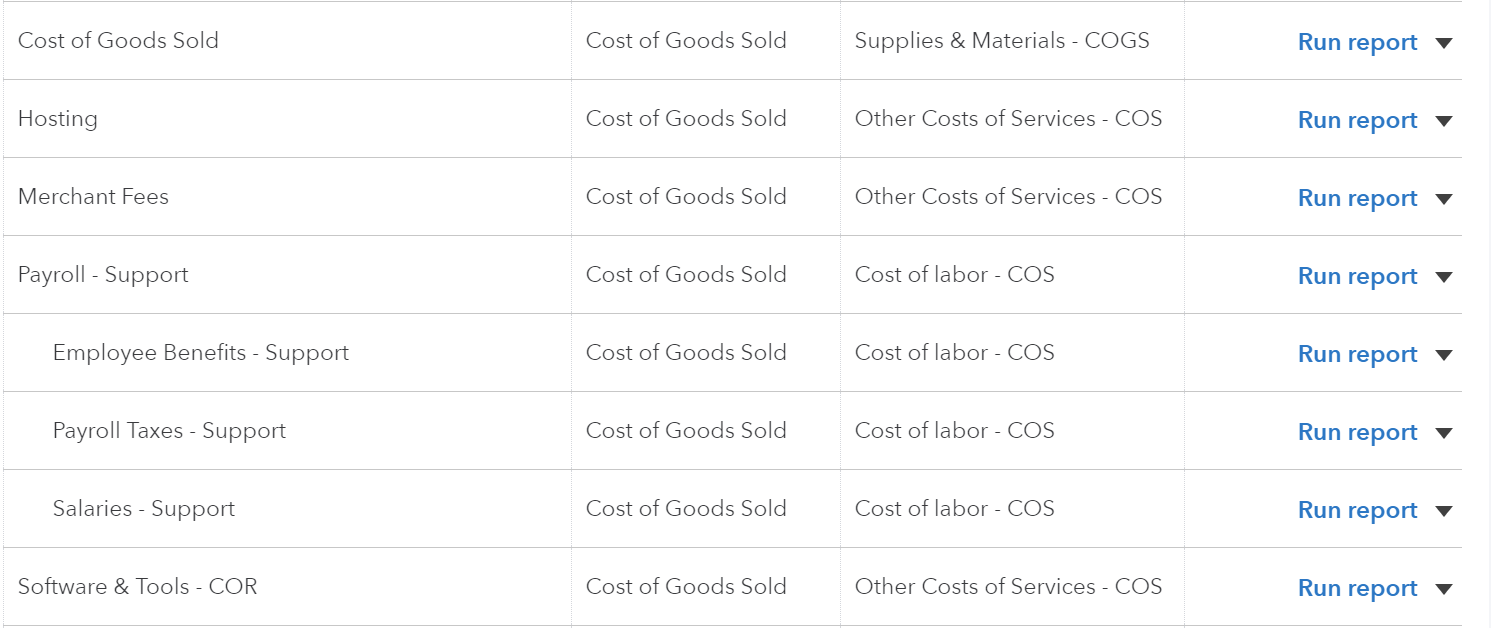
To do that, you’ll create new accounts in your Chart of Accounts.
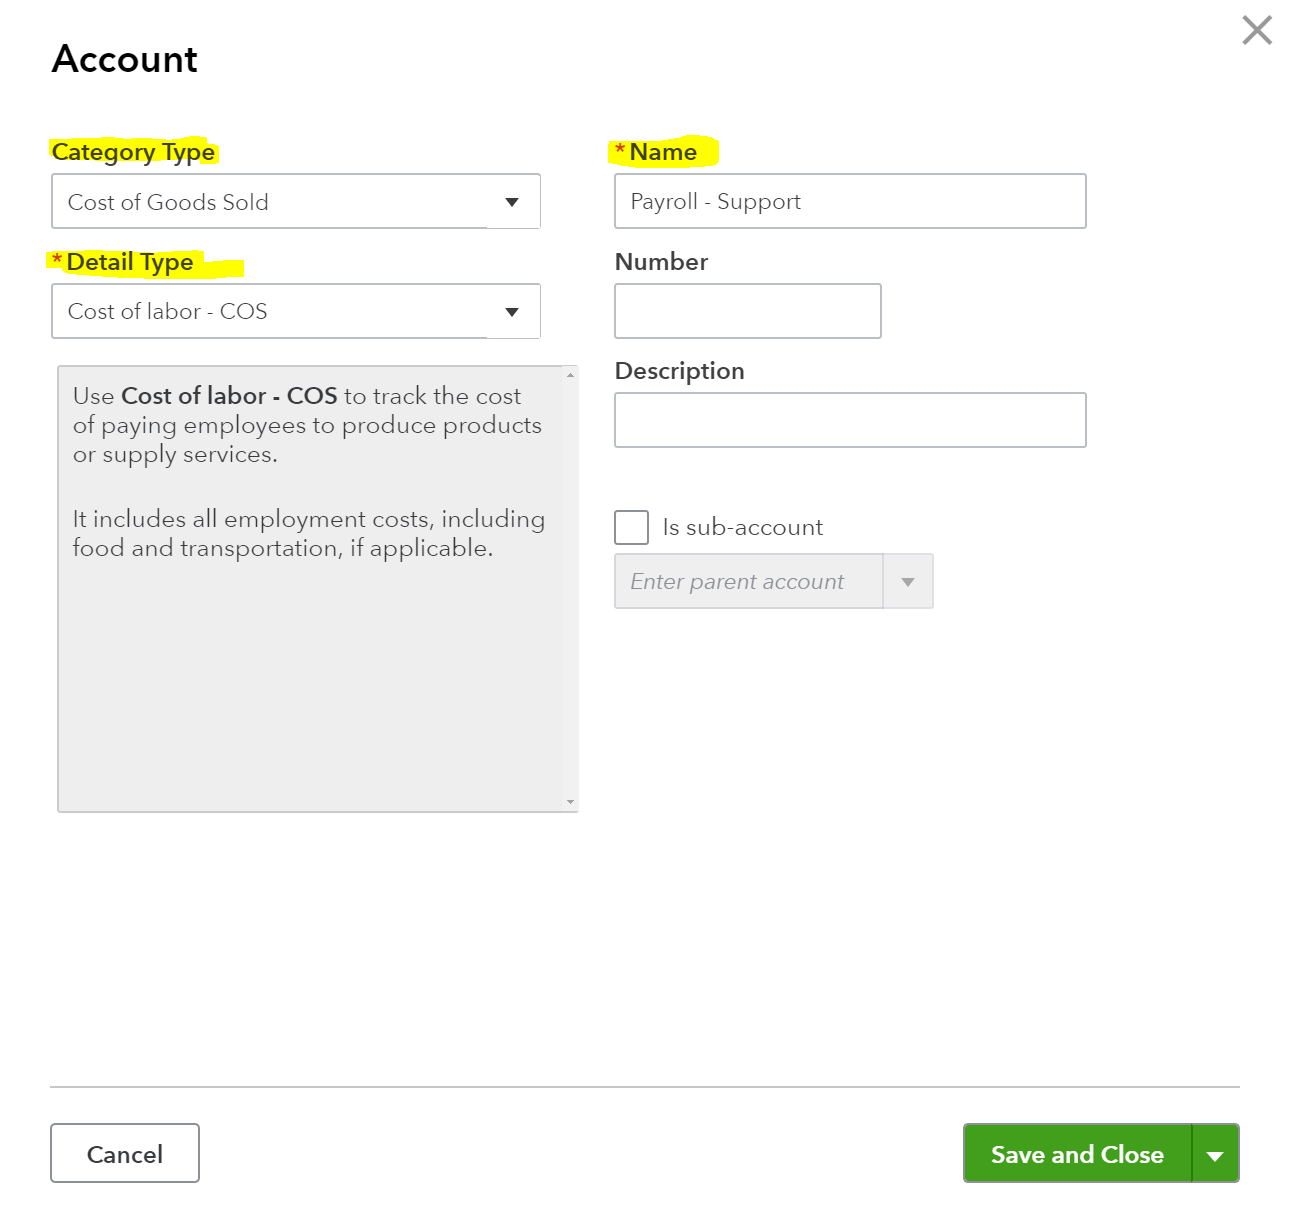
As you’re creating new accounts, you’ll need to set the Category Type as “Cost of Goods Sold” and set a name for the account. Let’s start with “Payroll – Support”.
You’ll also have to set a Detail Type to best represent the type of cost we’re talking about. With Payroll, Cost of Labor comes closest, although ideally we’d want to call this Payroll Expenses.
Finally, your accountant might want you to add an Account Number and Description, but those are optional.
Repeat this for other Cost of Revenue accounts you might need, such as Hosting and Software & Tools – COR and you’re all set. Just make sure to make the payroll sub-accounts such as Salaries, Benefits and Taxes under Payroll – Support to get cleaner-looking books.
Bonus
If you have sales from Professional services, you’d want to create two sets of Cost of Goods Sold — one related to selling your main product such as subscription services, and another for billings from your onboarding/consulting sales. This would make it easier to look the the profitability of each activity in isolation, as well as analyzing it as a whole.
Sales & Marketing
Next, we set up your Sales & Marketing (S&M) costs. You’ll need this section to calculate your company’s Customer Acquisition Cost (CAC), which, along with Customer Lifetime Value is one of the most important SaaS metrics in determining if you’re running a sustainable business.
Setting this up is fairly similar to COR, but we first need to create a Sales & Marketing account under Category Type: Expenses.
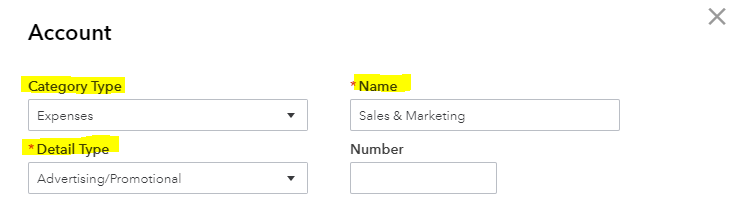
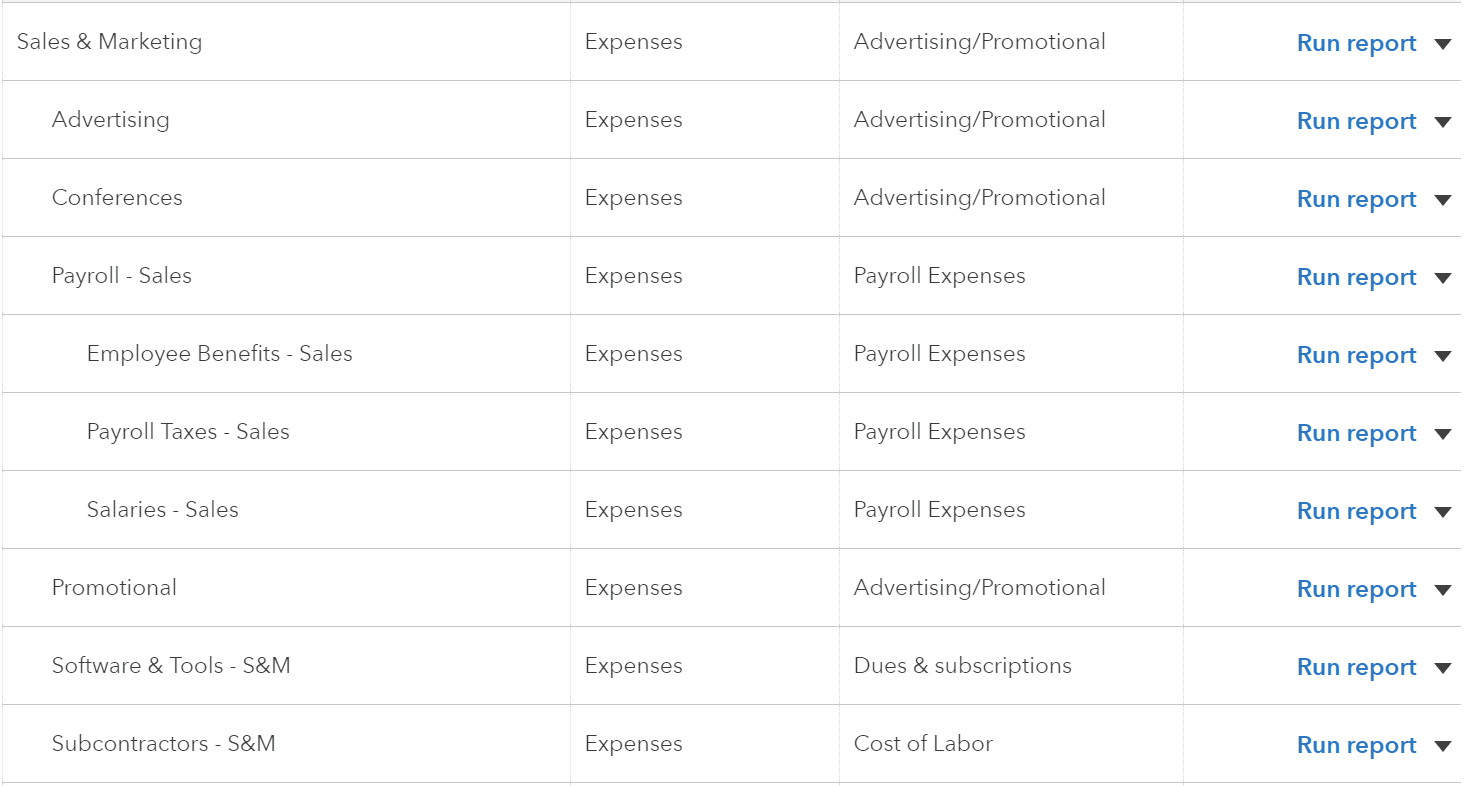
In this example, we’re assuming that your Sales & Marketing costs consists of Sales payroll, advertising through Google Ads, going to a conference to sell your product, and subscribing to a marketing solution such as Hubspot.
This makes it pretty easy to see how the chart of accounts would look like:
Bonus
You could take this several steps further and create two more sub-accounts that house their own set of individual accounts: Sales, and Marketing. There, you could separate Sales to Account Executives, SDRs, Sales Travel and other strictly sales related activities, while Marketing would contain advertising, promotions, conferences and so forth.
Engineering
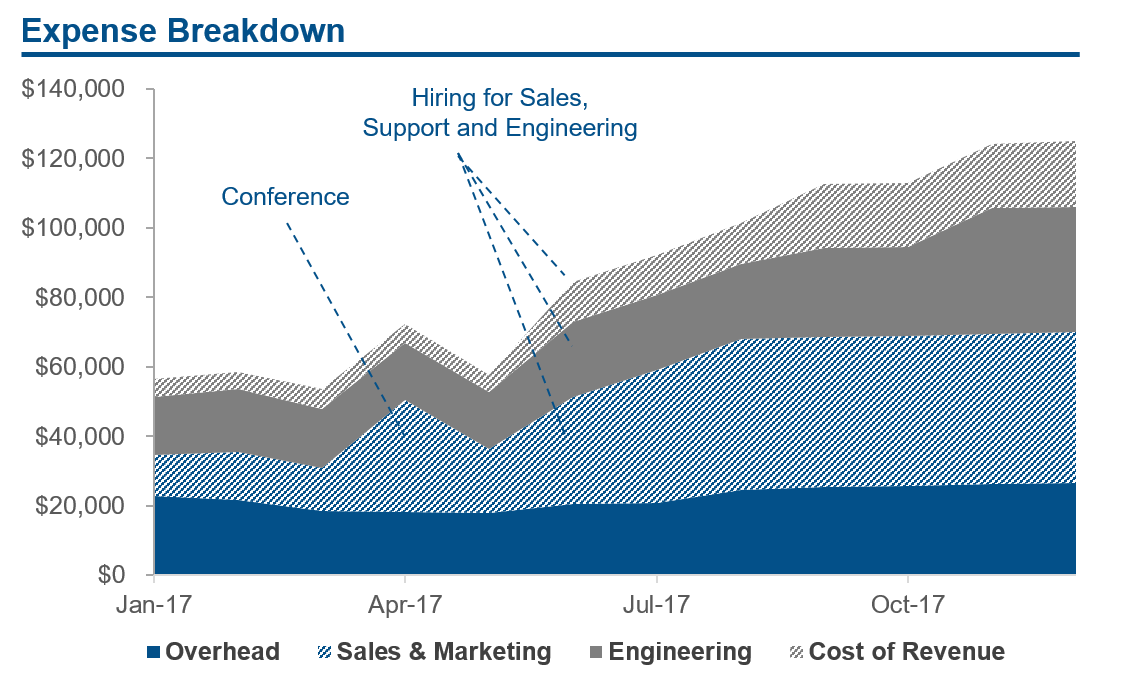
The benefits of separating Engineering from your General & Admin expenses are less obvious, but I’d still recommend doing it. For one thing, you might want to benchmark your Engineering spend as a percentage of your total expenses to compare yourself to other SaaS companies. Even if you couldn’t care less what others do, you might want to determine if you are investing enough in the long-term success of your presumably tech-focused company.
In addition, the more detailed your expense accounts, the easier it is to track your performance against the budget . For example, if it looks like in May that you’re spending more than you had planned, why is that? Is it because your Engineering is hiring faster than expected, or are there expenses that are getting out of hand? Or perhaps Sales activities are actually working and you should be doubling-down.
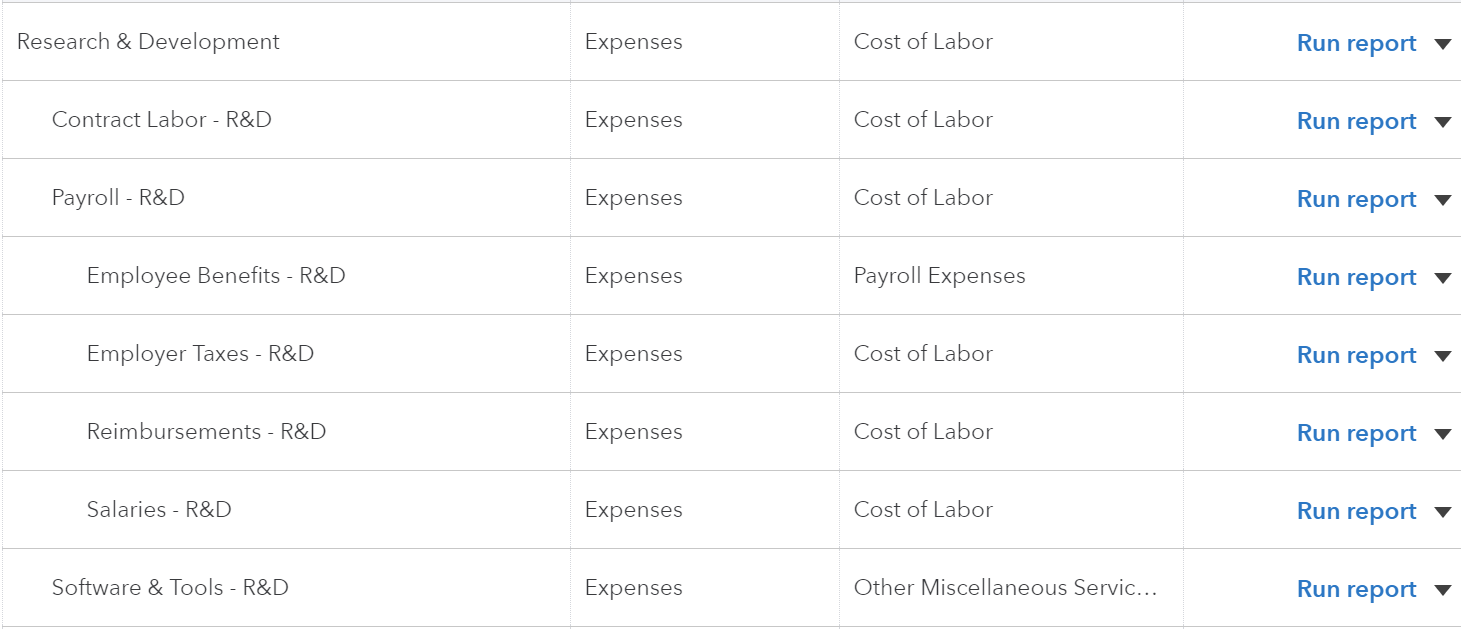
Setting up Engineering (or Research & Development) is similar to the earlier section. Create an Engineering top-level account and add Payroll – Engineering and its sub-accounts of Wages, Taxes and Benefits. You’ll probably want to include Contract Labor – Engineering for any contractors you work with, such as designers or devops.
Lastly, I usually create a software category for each major expense category for consistency — in this case Software & Tools — Engineering.
General & Admin (G&A or Overhead)
Finally, we’re going to create a catch-all category for virtually everything that goes to running the day-to-day of your business.
First, start by creating a General & Admin top-level category, followed by Payroll – G&A, and its sub-accounts Wages, Taxes and Benefits. Alternatively, you could rename your current payroll categories to match this new formatting, and merely move out the other expense categories going forward.
Next, you’ll need to move your existing accounts under General & Admin. The goal is to not have a single account that doesn’t “live” inside either Cost of Revenue, Sales & Marketing, Engineering, or General & Admin. This means accounts such as Rent, Utilities, and Telephone get moved under G&A. The only exception are entries that have little to do with day-to-day operations, such as Depreciation, or Interest Income. Those you can move under Other Income / Other Expenses.
Next Steps
Now when you have your expense categories set up, you can begin to automate part of the process. An easy next step is to utilize bank rules to auto-categorize individual expenses to their respective categories. For example, Amazon Web Services or AWS in the bank description is very likely to go to Cost of Revenue under Hosting.
In addition, you can sync your payroll provider such as Gusto with Quickbooks, and map each of the Gusto “Teams” to match the newly-created Payroll categories and subcategories.
The goal here is to automate the categorization of recurring expenses, increasing the accuracy and reducing the need of manual work by your bookkeeper.
Takeaway
These changes in your expense categorization should result in greater visibility to your past performance, but also make it easier to forecast the future. As a byproduct, you’ll get overall cleaner-looking books that are easier to share and explain with your team, investors and advisors.
Let me know if you have any questions or feedback in the comments!
Note: This is not a tax or accounting advice. I’m not a CPA or a lawyer, and you should consult with yours before making any permanent changes to your books.