Table of Contents

Using a SaaS tool or feature for the first time can be difficult and even discouraging. You purchased with one goal in mind: increase revenue.
When you aren’t sure how to use a tool or feature, not to mention how to maximize your ROI, it can be challenging to get started right. We recognize that our customers get the most out of our tools when we do our job of educating them on how to do just that.
Here at Baremetrics, along with our metrics, we offer additional tools like customer segmentation, our customer insights platform, a SaaS forecasting tool, and our dunning solution, Recover. With so many solutions, making sure that any current or potential customers have the information they need to maximize return is a must.
In this article, we’re going to walk you through one of our tools, Baremetrics Recover, and show you how to set it up. By the end, you’ll know exactly what you need to get started right and maximize returns using Recover.
What is Baremetrics Recover?
Baremetrics Recover is a one-stop shop dunning software developed by us. From customized email campaigns to in-depth analytics on recovery rates to in-app customer reminders, Recover provides you with the most in-depth dunning tool experience.
But aside from the fact that we developed it, there are plenty of reasons to use Recover. For one, it’s integrated with the rest of our metrics, so you can get deeper insights than other dunning tools.
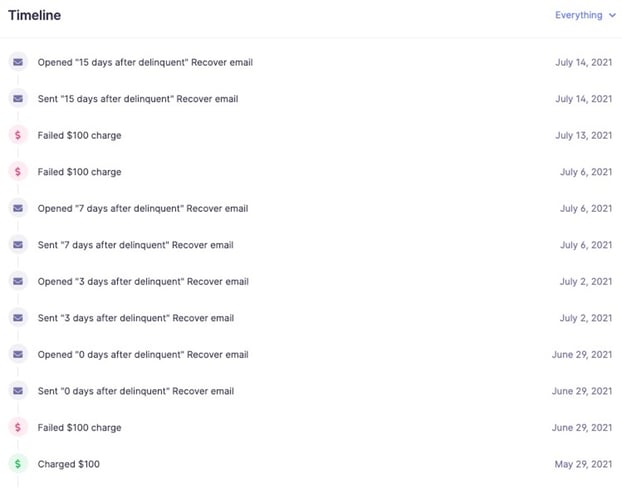
For example, when viewing a customer’s profile, you’ll be able to see what plan they’re on, and a timeline of any failed charges, dunning emails sent, and more all in one place.
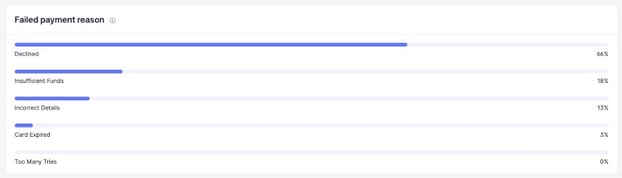
Secondly, in the “performance” dashboard for Recover, you can scroll down and view the reasons why your customer’s credit cards are failing:
And even a breakdown of how each dunning email performed (including how much revenue you recovered from each email):
We believe that every SaaS & subscription business needs a dunning solution. Because the question shouldn’t be “Why should we use a dunning solution?” but rather “how much is it costing you every month, not using one?”.
If you want Recover, you can get a 14-day free trial today.
3 Tips for Maximizing Return with Recover
You decided to recover your customer’s failed charges on autopilot with Recover?
Boom – you’re in.
Now you may be thinking, “How should I use Recover to get the most money back?”
Fair question.
Our approach has been refined over the years now having hundreds of SaaS businesses using Recover. Apart from the basics of getting signed up, here are 3 tips for recovering the most failed payments using Baremetrics Recover.
1. Fully Customizable Your Emails
When emailing customers about failed payments, it always helps when that email looks familiar to the customer. Using Recover allows you to do so with a fully customizable email experience in three key ways:
A. Words
B. Styling
C. Credit Card Form
Email Content
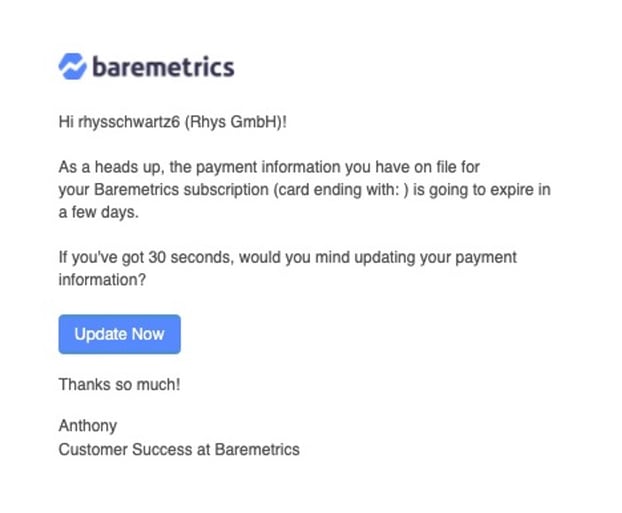
We encourage Recover users to update each email verbiage to further be in line with your company. Like below:

To access, go to Recover → Settings → Emails → and click on the drop-down arrow next to each email template to add your own copy!
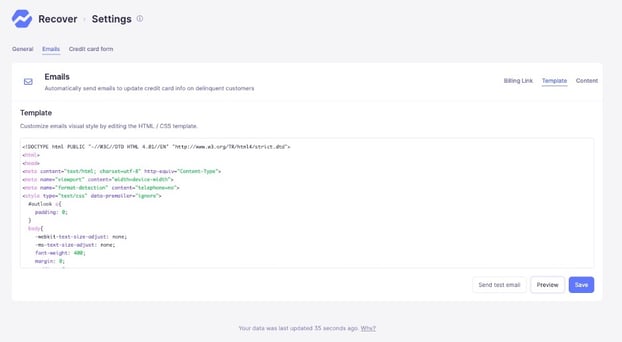
Styling of the email
Secondly, you can customize the email’s styling by editing the HTML / CSS template.
If you already have a stylized email in a tool you currently use (like Intercom or an email tool), you can likely reuse the same HTML. Be sure to look out for a few modifications and ensure that you include the {Content} parameter in the email.
Here’s an example of our styled email once the HTML/CSS template has been modified:
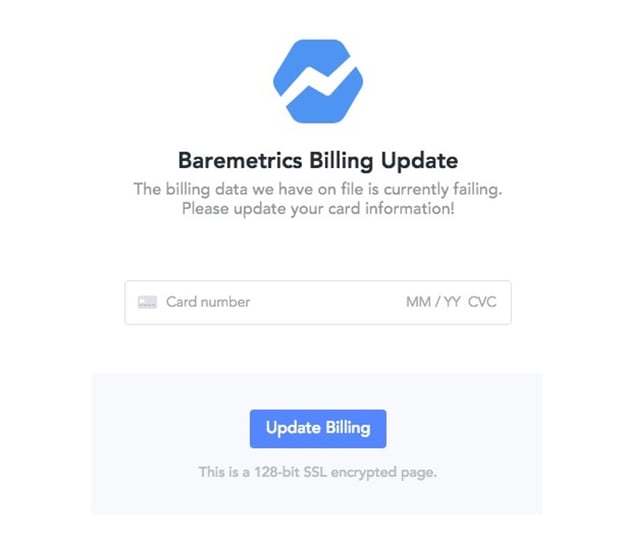
Credit card form
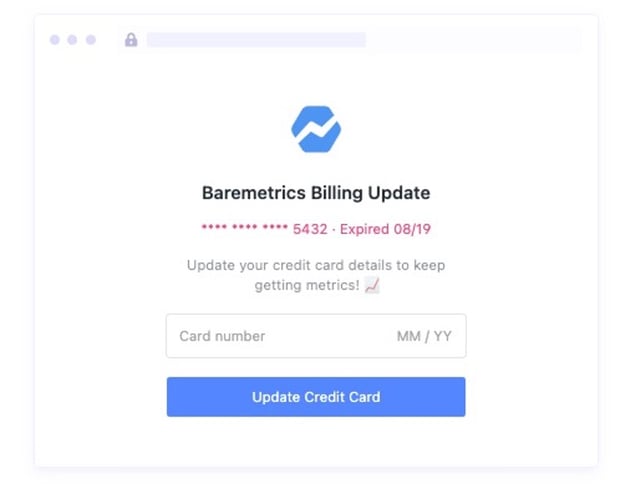
This is an example of a branded email form we send. The goal here is to help your customers feel like they’re still in your company’s experience.
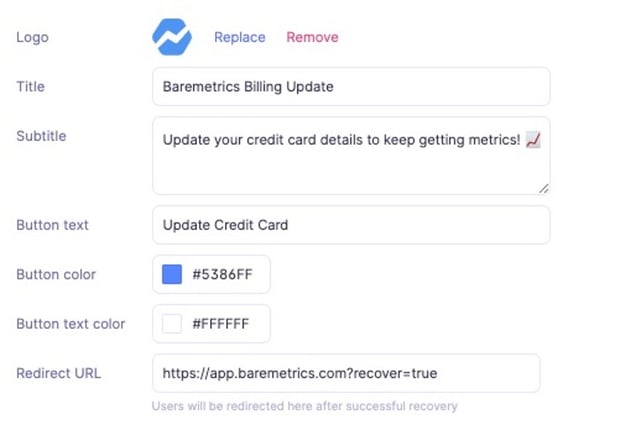
To edit, head into Recover’s settings under the credit card form. Once there you will see a similar view as above. We suggest updating:
- Logo
- Title (ie company name)
- Subtitle copy
- Button text
- Primary & secondary colors
Each email is meant to match everything from your verbiage and tone to your brand and everything in between!
Call to Action button
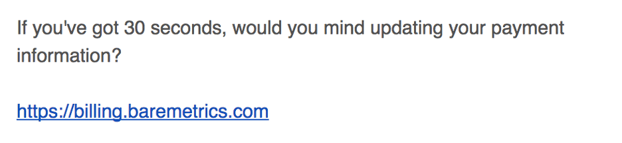
The final way you can further customize your emails is by adding a call to action button.
The simplest way is to include the {BillingLink} in each email template, which will give you something similar to what you see below:
To get a call to action button, remove the {BillingLink} attribute from the individual templates and instead use the {BillingURL} attribute as part of an image or button link, like below:
<a href=”{BillingURL}” style=”font-family: ‘Helvetica Neue’, ‘Helvetica’, Helvetica, Arial, sans-serif; font-size: 100%; line-height: 2; color: #FFFFFF; text-align: center; border-radius: 5px; display: inline-block; cursor: pointer; font-weight: normal; text-decoration: none; background: #4A90E2; padding-left: 15px; padding-right: 15px; border-color: #4A90E2; border-style: solid; border-width: 4px 0; letter-spacing: 0px;” target=”_blank”>Update Now</a>
You can find all the code you’ll need in our help documents. Simply go to ‘collections’ → ‘Recover’ → ‘Customizing the global template’ (or for the sake of time, just go here).
2. Embed the Widget on Your Website
Recover’s performance is stepped up a notch when you embed it directly into your website.
Prompting your customers on your website in addition to email will ensure you recover even more failed charges!
You can get your unique embed script on the Billing Form page. Go to Recover in your dashboard → Settings → Credit card form. Once there scroll down and your script will be there.
Here’s how it all works:
Grace Period
During the grace period, we float a reminder along the bottom of the page. The default grace period setting in Recover is 10 days.
You can set the duration of the grace period, for instance, our team goes with 7 days. Also, be sure to customize the color and copy of the banner.

Note that during the grace period, this banner won’t prevent your customers from using your app.
Delinquent Modal
After the grace period is over, your customers are presented with a credit card form and not allowed to use the app until they update their details.
This is the same form that you configured earlier:
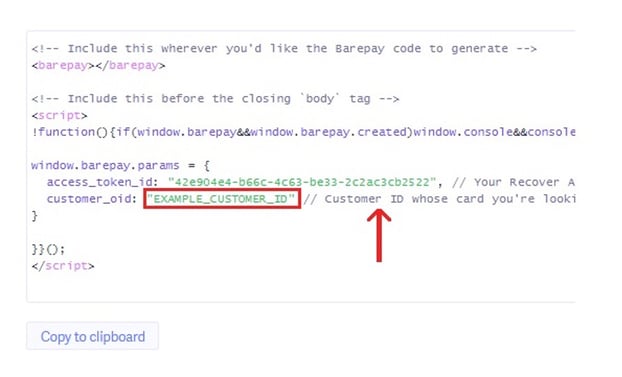
Embed Script
Now comes the embed script. Load the embed script anywhere on your website that you would like it to appear.
When embedding, leave everything as is except for the CUSTOMER_ID, which you should programmatically replace with each user’s unique customer number given by your payment provider.
Encryption
By enabling this option, you can sign your request data with a secure token only known to your backend and Baremetrics. Once you start sending JWTs, our backend will no longer accept unsigned requests.
3. Select and Send all Emails in the Campaign
One of the biggest mistakes you can make when using Baremetrics Recover is to send a single email and call it a day.
DON’T do that and here’s why.
People put things off, emails get overlooked and life happens. If you want to recover more revenue from failed payments, you have to be persistent.
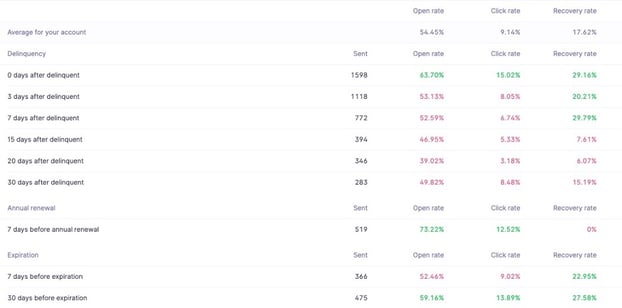
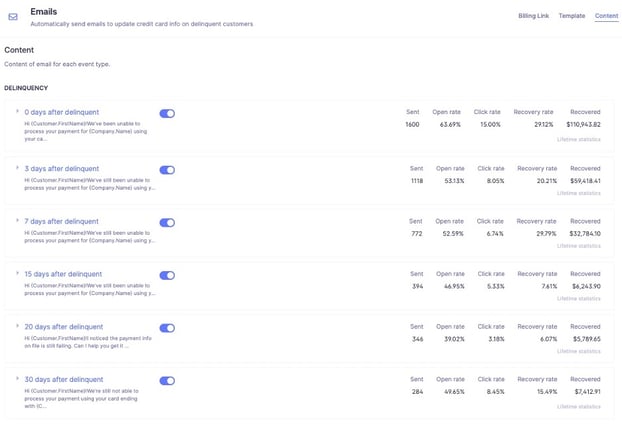
Just how many emails should you send? Turn on ALL of the emails under the “delinquency” section, emails day 0-30.
We’ve analyzed over 1 million dunning emails sent by our customers with Baremetrics Recover, and here’s what we found:

You can see the first email sent is the most effective (0 days = the email sent the day of the failed payment). But look at the following emails sent after that.
Imagine if you only sent one email. No reminders, extra nudges, or last-ditch efforts to keep a customer using your product. All the customers who didn’t open or click your email or update their billing info would go unpaid until who knows when.
This is one of the reasons we don’t recommend relying on out-of-the-box dunning emails from your payment processors (ie Stripe). With most of them, your emails are sent over 7-14 days. And as you can see from our data above, expanding to 30 days allows you to recover A LOT more revenue.
If you’re concerned about coming off as too pushy by sending multiple dunning emails, don’t be. Some customers need to be reminded multiple times before they’ll take action.
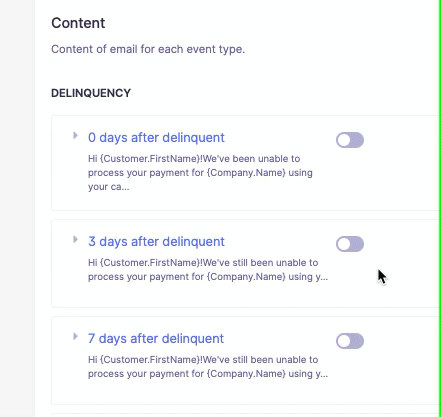
To turn ALL your emails on in your Recover settings, you’ll want to go to Recover → Settings → Emails → Content. Once there you will see all pre-written dunnings emails as below:
But before you go…
Now you’re good. 😉
Save More Revenue with Baremetrics Recover
There you have it – all you need to know to maximize the best return using Baremetrics Recover. If you take action and follow best practices, Recover will single-handedly pay for your Baremetrics subscription and more.
Again, the question shouldn’t be “why should we use a dunning solution?” rather “how much is it costing you every month, not using one?”.
If we’re wrong and the recovered revenue doesn’t at least pay for your entire Baremetrics account, we’ll credit your team the next month! No commissions. No gimmicks. No hidden fees. We offer simple tiered pricing so you don’t overpay for commission on the revenue that should be yours in the first place.
Sounds too good to be true, fortunately for you, it isn’t!
To start recovering failed payments for your business, sign up for Baremetrics Recover today.


